
What do these photographs show?
Take a look at the attached photos and tell me what you think these shows. I’ll post the answer later this week for those who are curious but I’ll give you a hint: This is proof that the early 206 Dinos were hand shaped.


Blocking, blocking, and more blocking! As we get ready for the next primer stage we are going through yet another blocking. This makes the car flat, which is a difficult proposition when there are no flat surfaces on a Dino! I also pulled some tape today to get a feel for the body lines. The tape gives me a guide to where body lines should be as I am blocking. We block to the edge of the tape.
We also fabricated new bumper “ear” brackets for the 206 as well.


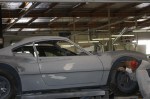


We’re in the second primer but we’re still in 150 Long Board Dry. This primer bakes in the spray booth for 40 minutes at 120 degrees and then it’s moved outside to cure further out in the Southern California sun. As the day goes on the primer cools down slowly with the outside temperature decreasing toward late afternoon. This all plays a role for minimal shrinkage. This primer stage really sets a good foundation for blocking and ultimately for the final paint surface.
This is the stage I really like because this is where it all comes together…where we fine tune shut gaps and surfaces. It’s also exciting because we are getting closer to color. Most painters would go to paint from here and be happy with the surface being straight but we’ll be going into another primer to make things flat…. there is a difference.
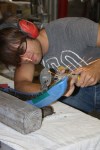
At this stage we’re using specially made 24″ – 32″ boards. These are specially made blocks with titanium rods so you can adjust the stiffness of the board for the sweeps and contours of the vehicle. For Dinos it’s REALLY important because there are no flat panels on the car. There’s nothing flat on these cars! Because of their design and the sheet metal used Dinos are one of the hardest cars to surface correctly. But it’s the curves and body lines of the Dino that make them so sexy!


Surfacing is one of the most grueling stages of restoring a car. It is such physical labor and truly takes a toll on you. For the experienced craftsman it is the key to a fine finish. Although this is the toughest stage, it is also the most critical stage. This is the point at which we fit doors, lights, accent lines, deck lid, engine cover. This is where fit and finish starts so that when we finally reassemble the car everything fits together beautifully.
Anyone who knows me knows I am a nut when it comes to shut gaps. I know that “it’s not the way they came from the factory” but the Italian Craftsmen were working on a line and didn’t have the time to focus on this detail.

")
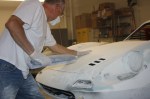
Surfacing continues on the 206 using a great new product out of Europe. HB Body 290 is one of the best body filler products with I’ve used in years. This product is a combination of excellent micro-balloons and a recipe for great resins. The dry time is short and the resins don’t leech out of the surface. It dries smooth and tack-free. Where other fillers dry sticky and clog your sandpaper HB Body 290 feels like rubbing your hand on a piece of cardboard after it dries. Because of the drying quality I use less paper and I always get a nice clean cut. I highly recommend it.
. . . moving ever closer to paint!
Over the weekend I was checking out what might be at auction at the Pebble Beach Concours d’Elegance and was interested to find a Dino 246 GTS Chairs and Flares on its way up for the auction. Take a look at the Road & Track blog. From the photographs it looks like a pretty nice car. It’ll be interesting to see how much it fetches.
Anyone who owns one or restored one knows that Dino Ferrari doors tend to sag over time. The hinge holes “egg” out from use. Such was the case with the Dino 206 we are resurfacing. In order to get the best fit we had to install new over-sized pins and line ream the hinge holes so the pins would move through freely. Some folks, when they’re at this stage, get the over-sized pins and drive them in where it’s almost impossible to ever take them out again. It’s so important to take the time to line ream everything together so that you’re new pins slide down nicely with just a “tap”.
When we’re surfacing we probably take the doors on and off the car three or four times before paint. It makes my job so much easier when I don’t have to get a torch to heat up the hinges and pound the pins out every time.
Thanks to Alex S. for his expertise in line reaming the hinges!


The iconic Dino badge from the front nose of the Dino 206 was not only missing when we received it but the indentation where the badge goes was missing as well. This prompted us to have to cut out a new insert and weld it in so it could accept the badge. The owner purchased a new badge that we fit into the new insert.
The photo shows the initial fit.
")
We finished a paint restoration on this cute little Nova SS about a year ago. I asked for it back to give it a little detail for the owner and had a chance to have a photo shoot. It sure is a cute car and a great driver. It’s the perfect way to drive down Pacific Coast Highway on a sunny day.
For the detail we color sanded and rubbed out the paint, freshened up the wheel wells and tires, and did a complete interior and exterior detail. This pampered car will surely see many, many great years to come.

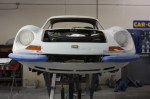
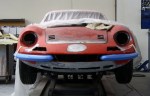
This rare Dino 206 came to us with several parts missing including the front and rear bumpers as well as the inner bumper bracketry; the Dino badge and the badge indentation on the front nose; and the rear deck lid button. Special attention was given to fabricating the missing items as well as research to find rare, hard-to-find parts.
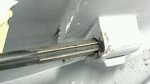
The first thing we tackled was the internal bumper brackets and housings to mount new bumpers. We fabricated and duplicated bumper bracketry using a template from another client’s Dino 206. Beau welded the fabricated bumper bracketry into place. The owner bought new bumpers, which we installed and fitted.
-

- Fabricated Dino Inner Bumper Brackets
-
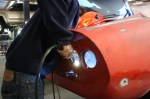
- Welding fabricated bumper brackets in
-
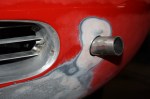
- Front Bumper Brackets
-
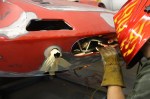
- Installing fabricated bracketry
-
- Fitting New Bumpers
